First of all, I'd like to thank you for coming, and I'd like to congratulate you in advance for reading all I am about to post.
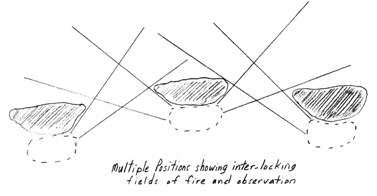
Sectors of Fire. What are they, and why do we need them? A firing sector, or zone, is a roughly forty five degree angle in your individual field of vision. It extends from you, and reaches as far as your weapon does. Targets within your sector of fire become your responsibility to engage.
This does not make them "your" kill, however. Sectors of fire can overlap, and often do. This is not someone butting in on "your turf", do not think of it as such. Rather, by keeping an imaginary "firing sector" spreading from your ally, based on their current position, you can get an idea as to whether or not that ally has a clear shot at an enemy.
Imagine the beam of a flashlight. It spreads outward at an angle, too. If any of that flashlight beam would splash light on the enemy, then that ally is able to hit that target.
In a perfect world, all targets are in the open all the time. Sadly, not all is right in the world... and enemies have cover. Cover breaks up the "light beam", and can reduce possible angles in which you or an ally might have a clear shot. In some cases, it may conceal the target completely from view, resulting in no shot at all.
The four "F's" of combat are
Find
Fix
Flank
and Finish
Finding targets is easy in Blacklight. It's more or less close quarters combat, and we all have HRV! Awesome! "Find" involves locating a target that is capable of being engaged, not simply finding any old thing. Targets that are isolated are dead targets.
Fixing the target is where you pin them in place. Taking cover might protect you from bullets, but it also in most cases limits your possible angles of return fire. Remember, cover your potentially pinned allies!
In this example, we have "soldiers" behind small stationary cover. The angles demonstrated here are the possible firing angles that the soldiers have available without having to step out of cover in order to take a shot. In order to acquire new, and possibly more useful angles, they must "leave" cover. The advantage you have over a target in this position is that there are only two possible places for them to attack from... the left, or the right of their cover. You can hold your aim on either side of cover (it's a 50-50 shot, and even if you're wrong, you don't have to shift your aim very far) and wait for them. I find many players are impatient, myself included. Sitting and hiding in cover wastes time they could be using to have a super-high K/D.
Flanking involves simply moving around to the side of their now fixed position, keeping your aim focused on the edge of the cover as you circle around. One could also have an ally circling the opposite way, firing past their side of the targets cover, creating a field of fire that the target is less likely to want to step through, leaving them only one recourse... stepping out on YOUR side of cover.
That is where the Finish comes in, the target has limited mobility (he can't move INTO the cover, so one direction is down... moving forward or backward doesn't move him out of the line of fire, and he can't stay where he is, so... he will make a lateral movement away from the source of cover) and very few options. Likely he is facing multiple targets at once, and unless he is EXTREMELY quick, he is likely going down.
Sectors of fire are also limited by doorways. Standing even a few feet inside of a door (shooting outwards) narrows your firing sector. Hallways of course can limit this further, as there is less room to shift and try and get a new angle. Shooting DOWN a hallway, though, forget sectors, it's just a straight shot with no means of shifting. For this reason, a heavily armored shield man in the front of the hallway can be helpful against incoming small arms fire... just be careful of explosives.